MODIFIED ON: November 29, 2022 / ALIGNMINDS TECHNOLOGIES / 0 COMMENTS

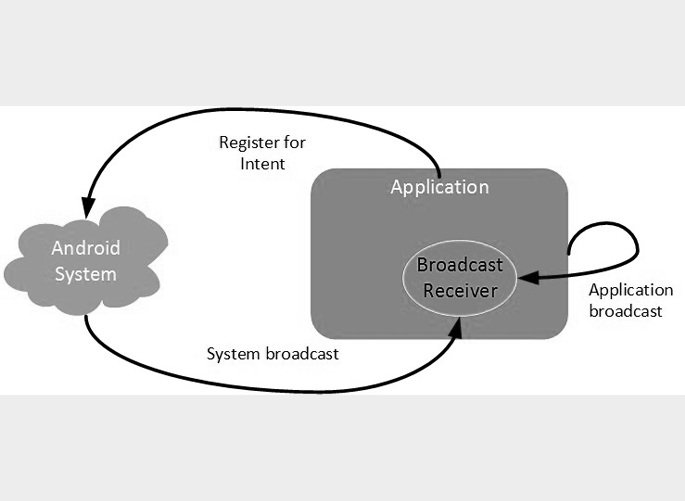
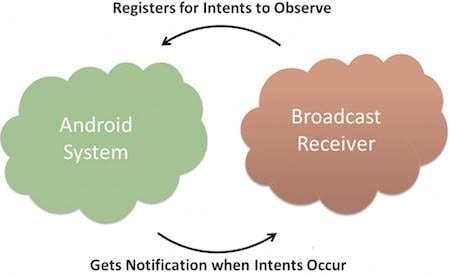
Android Broadcast Receiver is a component that responds to the system’s wide broadcast announcements. It can be registered for various system or application events. Whenever those events occur the system notifies all the registered broadcast receivers and then the desired action is being done. Broadcast originates from the system as well as applications. Like the alarm notification, low battery notification etc. are the example of broadcast originating from the system. While getting the push notifications for desired application describes the example for broadcast originating from the application.
How to make BroadcastReceiver works for the system broadcasted intents?
There are mainly two steps to make BroadcastReceiver works for the system broadcasted intents
- Creating a Broadcast Receiver
- Register Broadcast Receiver
1. Creating a Broadcast Receiver
public class MyBroadcastReceiver extends BroadcastReceiver {public MyBroadcastReceiver () { }@Overridepublic void onReceive(Context context, Intent intent) {
This method is called when this BroadcastReceiver receives an Intent broadcast.
Toast.makeText(context, “Action: ” + intent.getAction(), Toast.LENGTH_SHORT).show();}}
Consider a receiver class named as MyBroadcastReceiver implemented as the subclass of BroadcastReceiever class which overrides the onReceive() method. Whenever an event occurs Android calls the onReceive() method on all registered broadcast receivers. In the above code, the Intent object is passed with all the additional information required and also you have got the Context object in order to do other tasks like maybe start a service (context.startService(new Intent(this, TestService.class))
Register the Broadcast Receiver
There are two ways to register the broadcast receiver:
- Static way (in manifest file).
- Dynamic way (in code).
Static way
In static way, the broadcast receiver is registered in an android application via AndroidManifest.xml file. Consider, here we are going to register MyBroadcstReceiver for system-generated event ACTION_BATTERY_LOW which is fired by the system once the android system encounters the battery low.

<applicationandroid:icon=”@drawable/ic_launcher”android:label=
”@string/app_name”android:theme=”@style/AppTheme”><receiverandroid:name=”MyBroadcastReceiver”><intent-filter><actionandroid:name=”android.intent.action.BATTERY_LOW”></action></intent-filter></receiver></application>
Now, whenever your android device will encounter battery low problem it will trigger the BroadcastReceiver, MyBroadcastReceiver and the desired action mentioned inside onReceive() method will be executed. Like, if you look into your android device you gets a dialogue message warning you that the battery is low so put it in charge.
Some other important system events are as follows:
| Event Constant | Description |
|---|---|
| android.intent.action.BATTERY_CHANGED | Sticky broadcast containing the charging state, level, and other information about the battery. |
| android.intent.action.BATTERY_LOW | Indicates low battery condition on the device. |
| android.intent.action.BATTERY_OKAY | Indicates the battery is now okay after being low. |
| android.intent.action.BOOT_COMPLETED | This is broadcasted once, after the system has finished booting. |
| android.intent.action.BUG_REPORT | Show activity for reporting a bug. |
| android.intent.action.CALL | Perform a call to someone specified by the data. |
| android.intent.action.CALL_BUTTON | The user pressed the “call” button to go to the dialer or other appropriate UI for placing a call. |
| android.intent.action.DATE_CHANGED | The date has changed. |
| android.intent.action.REBOOT | Have the device reboot. |
Dynamic way
In dynamic way, we use Context.registerReceiver() method. Dynamically registered broadcast receivers can be unregistered using Context.unregisterReceiver() method.
BroadcastReceivermReceiver=newMyBroadcastReceiver();
registerReceiver(this.myReceiver,newIntentFilter(“MyBroadcast”));
IntentFilter object that specifies which event/intent our receiver will listen to. In this case, it’s broadcast. This action name is used while sending a broadcast that will be handled by this receiver.
@Overrideprotected void onPause() {unregisterReceiver(mReceiver);super.onPause(); }
Once the component that had made the registerReceiver() call is destroyed sendBroadcast() will also stop working, hence the receiver won’t receive anymore be it an event generated from an app or the system. Whereas with the previous method where we registered via the manifest file, this is not the case.
Dynamically registered receivers are called on the UI thread. Dynamically registered receivers block any UI handling and thus the onReceive() method should be as fast as possible. The application may become sluggish of an “Application Not Responding” error is the worst.
Which Method to Use When for Registration
The type of preference among the two approaches is determined by the motive. Suppose you want to do some changes right on the screen (home screen, launcher, status bar, etc.) By showing up some notification or some indicator in the status bar by listening to system-wide events or maybe those sent by other apps, then it makes sense to use statically registered broadcast receivers. Whereas based on similar events you want to do changes right in your app when the user is using it or maybe it’s put in the background, then it makes sense to use dynamically registered receivers which last till the registering components are destroyed.
In fact, there are certain events like Intent.ACTION_TIME_TICK that cannot be registered in the manifest but only via registerReceiver() to prevent battery drainage.
Broadcasting Custom Intents
If one wants that the application itself should generate and send custom intents then one will have to create and send those intents by using the sendBroadcast() method inside the activity class. If one uses the sendStickyBroadcast(Intent) method, the Intent is sticky, meaning the Intent you are sending stays around after the broadcast is complete.
public void broadcastIntent(View view){Intent intent = new Intent();intent.setAction(“com.example.broadcastreceiverdemo“);
sendBroadcast(intent);}
This intent com.example.broadcastreceiverdemo can also be registered in a similar way as we have registered system-generated intent.
<applicationandroid:icon=”@drawable/ic_launcher”android:label=
”@string/app_name”android:theme=”@style/AppTheme”><receiver android:name=”MyReceiver”><intent-filter><action android:name=” com.example.broadcastreceiverdemo“></action></intent-filter></receiver></application>
You can see a working example by visiting this link.
– Deepika Bisht
Leave a reply
Your email address will not be published.
-
Recent Posts
- The Ultimate 4-Step Guide to Modernizing Your Applications
- The 12 Most Popular Computer Vision Tools in 2024
- How MLOps is Transforming Businesses in 2024
- The Ultimate Guide to Product Engineering Services for Businesses
- 5 Top Use Cases of Computer Vision in the Hospitality Industry
-
Categories
- MVP Development (5)
- AlignMinds (55)
- Operating Systems (1)
- Android POS (3)
- Application Hosting (1)
- Artificial Intelligence (23)
- Big Data (2)
- Blockchain (1)
- Cloud Application Development (7)
- Software Development (29)
- Software Testing (9)
- Strategy & User Experience Design (4)
- Web Application Development (23)
- Cyber Security (6)
- Outsourcing (7)
- Programming Languages (3)
- DevOps (5)
- Software Designing (6)
- How to Code (4)
- Internet of Things (1)
- Machine Learning (2)
- Mobile App Marketing (4)
- Mobile Application Development (18)
- Mobile Applications (5)


